neoPhp Server
The neoPHP Server tool allows you to quickly set up a local HTTP server to host VisualNEO Web applications that utilize the neoPHP Plugin. This is particularly useful for testing and deploying server-side features, such as handling database interactions, file uploads, and other dynamic operations, without needing a full web server environment.
Key Features
- Local HTTP Server:
- Quickly spin up a local server for hosting VisualNEO Web applications.
- Uses the specified binding address and port to serve the application.
- Root Folder Configuration:
- Define the root folder of your application, which contains the files you wish to host.
- Automatically copies the config.php template if it’s not already present, ensuring compatibility with neoPHP Plugin actions.
- IP Address Display:
- Displays the local IP address, allowing other devices on the same network to access the server.
Just replace "localhost" with the local IP Address and use it as a URL in any other device connected in the same network to test your compiled app.
How to Use the neoPHP Server
- Launch the Tool:
- Open the neoPHP Server tool from the Tools menu in VisualNEO Web.
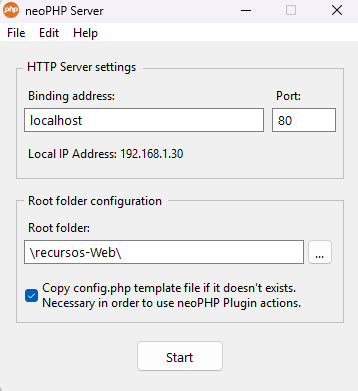
- Configure HTTP Server Settings:
- Binding Address: Specify the domain or IP address for the server (e.g., localhost for local use).
- Port: Set the port number for the server (default is 80).
- Set the Root Folder:
- Root Folder: Select the folder containing your compiled application’s files (e.g., d:\myapp-Web).
- Ensure the folder includes your compiled VisualNEO Web application and any necessary PHP files.
- Enable the checkbox to copy the config.php template if it doesn’t already exist. This file is required for neoPHP Plugin actions.
- Start the Server:
- Click the Start button to initialize the server.
- The server will begin serving files from the specified root folder.
- Access Your Application:
- Open a browser and navigate to the binding address and port (e.g., http://localhost:80) to access your application.
- Use the displayed Local IP Address to access the server from other devices on the same network.
Example Workflow
For an application that uses the neoPHP Plugin:
- Set the Binding Address to localhost and the Port to 8080.
- Set the Root Folder to C:\Projects\myapp-Web.
- Enable the checkbox to copy the config.php template if needed.
- Click Start to launch the server.
- Open http://localhost:8080 in a browser to test your application.
Tips for Success
- Avoid Conflicting Ports:
- Ensure the port you select is not already in use by another application or service.
- Edit the config.php File:
- Modify the config.php file to configure database connections or other server-side settings as required by your application.
Check neoPhp plugin for more information. - Test Across Devices:
- Use the displayed Local IP Address to test your application on mobile devices or other computers connected to the same network.
Use Cases
- Local Testing:
- Test applications with server-side functionality before deploying them to a production environment.
- Debugging neoPHP Actions:
- Verify that server-side scripts, such as database queries or file uploads, are functioning as expected.
- Quick Deployment:
- Set up a temporary server for demonstrations or small-scale testing without requiring a full web server.
Created with the Personal Edition of HelpNDoc: Easily create iPhone documentation